
How do I Add or Import Classes?
Christ in Us administrators and instructors can add classes individually. Christ in Us administrators can import classes. This article will go through the steps to add an individual class and create the class import file.
Manage Classes Page (Instructors & Administrators)
|

|
|

|
Add Individual Class
|
 |
|
 |
Faith Formation Models
The Christ In Us Lesson Planner and Calendar function best when classes are associated with a Faith Formation Model. There are six models for faith formation: School, Parish Religious Education, Liturgical Year, Family, Summer, and At Home. Here are the options with a brief description:
The Parish Traditional Model follows a traditional academic calendar with lessons taught in sequential order and weekly sessions.
The Parish Liturgical Year Model lessons align with the Church year's Sundays and their lectionary readings. This model supplies a primary lesson and an alternate lesson for you to choose from, and the lessons align with Sunday’s readings, and sessions meet weekly.
The School Traditional Model follows a traditional academic calendar with lessons taught in sequential order and taught over four or five days a week.
The School Liturgical Year Model lessons align with the Church year's Sundays and their lectionary readings. This model supplies a primary lesson and an alternate lesson for you to choose from, and the lessons align with Sunday’s readings, and sessions meet four or five days per week.
The Family Model is family-centered learning: a blend of group gatherings and home-based instruction. Parish family gatherings can occur up to nine times per year. The Family Model does not have a Lesson Planner, but dates for family gatherings can be selected and will appear in the Calendars.
The At-Home Model is parent/guardian instruction that features fully individualized learning on a flexible schedule. The parent/guardian typically adheres to a pattern of ten to twenty minutes of instruction on three or more days a week. The At-Home Model does not have a Lesson Planner, but At-Home events can be created in the Calendar.
The Summer Ten-Day Model is a two-week intensive program that blends classroom learning with group-based instructional activities during the summer months. The Ten-Day model is pre-set to be taught over a two-week period.
The Summer Custom Model provides the same resources as the Ten-Day model but allows for customization of dates and lessons. The Custom model allows for between five and 10 sessions.
Import Classes (Administrators Only)
|
Only Christ in Us Administrators will see the import Classes and Import Class Rosters.
|

|
|
For users with academic products in SadlierConnect, you must upload those classes in the Sadlier Connect portal.
For more information using Sadlier Connect and Christ in Us, click here.
Each of the Faith Formation Models in the section above has a unique class import template. Alternatively, classes can be uploaded using the No Model selection. Classes uploaded without a Faith Formation Model will not be connected to the Lesson Planner but can be associated with a model later.
|

|
Creating the Import File
To avoid errors, do not alter the columns' order or leave out information in a required column. The first row is example data.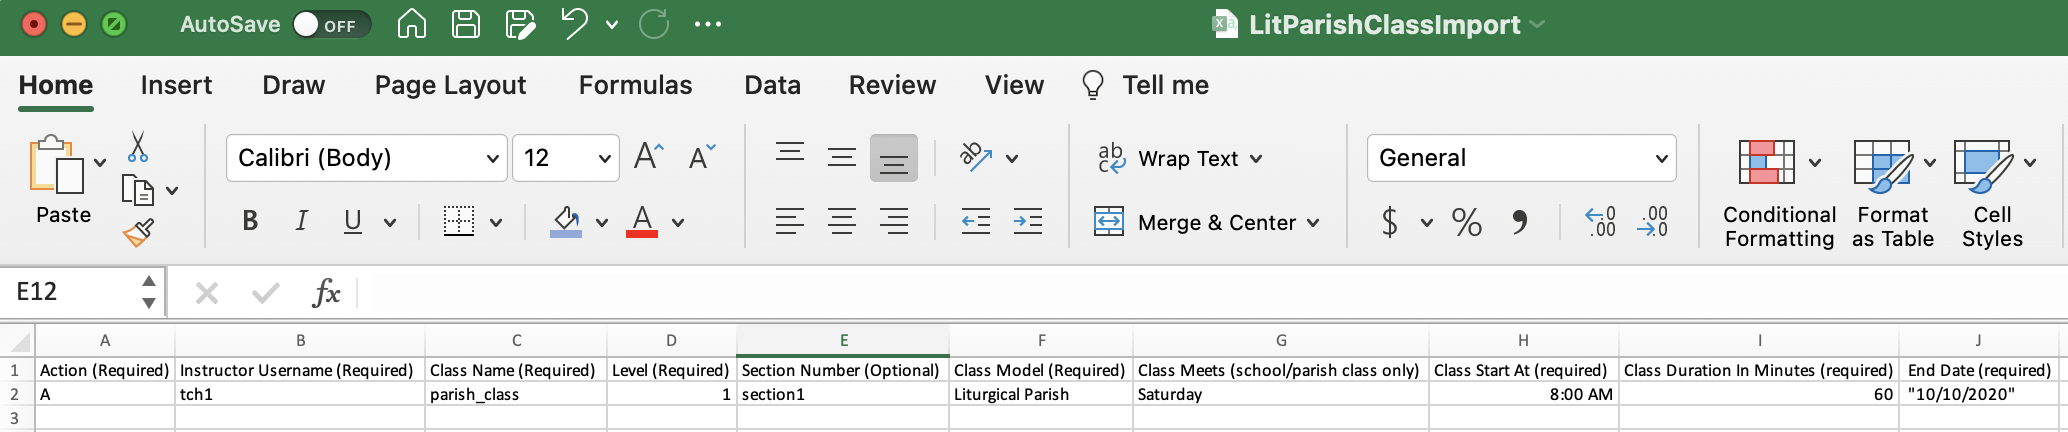
| Column Letter | Column Label | Description | ||||||||||||||
| A | Action (required) | This required field accepts A and U as valid entries.
|
||||||||||||||
| B | Instructor Username (Required) | The instructor's username must exist in Christ in Us before importing a class assigned to the instructor. If you need help adding an instructor, click here. | ||||||||||||||
| C | Class Name (Required) | Administrators, instructors, and students will use the class name to find the class and access the information in it. | ||||||||||||||
| D | Level (Required) | This required field accepts both options listed for each grade:
|
||||||||||||||
| E | Section Number (Optional) | This optional field is available if your institution uses section numbers. | ||||||||||||||
| F | Class Model (Required) | This required field is auto-populated based on the choices made before downloading the template. Christ in Us requires this field for each row, and you can copy it from the example row. | ||||||||||||||
| G | Class Meets (Required) | This required field is the day of the week the class meets. For Traditional Parish Model, it is once a week; however, other models have multiple days.
Please see the example data in the specific template you are using. Christ in Us recognizes the day spelled out, so please do not abbreviate. |
||||||||||||||
| H | Class Start At (Required) | This required field accepts the H:MM AM or H:MM PM formats, like 8:00 AM or 12:30 PM. | ||||||||||||||
| I | Class Duration in Minutes (required) | Enter a numeric value for the number of minutes the class meets. (Examples of acceptable entries are 30, 60, or 90) | ||||||||||||||
| J | End Date (required) | This required field accepts the format 6/16/2022 and must be a date in the future. |
Saving the Class Import File
- Please remember to remove the example row before saving your class import file.
- Save your class import file by selecting "File > Save As..."
- On the File Format section of the Save As screen, set it to Comma Separated Values (.csv).
Christ in Us will only import Comma Separated Values (.csv) file formats. Please be sure to select the correct file format, Comma Separated Values (.csv), when saving your file.
Uploading the import file
- Return to the Import classes page in Christ in Us.
- Click the "Choose File" button and find the CSV file you created.
- Click the Continue button.
Christ in Us will check the import file for errors. The example below shows the grade value is not in the system. For this example, we entered "Grade 7".

Please notice the scroll bar above the columns if you need information on an error. If you receive an error on any rows, those rows will not import, and you should fix them in the file and upload the new saved CSV. When the file is error-free, click the Import Roster button.